Required Tools for this Project
Have the necessary tools for this DIY project lined up before you start—you’ll save time and frustration.
- 4-in-1 screwdriver
- Wire stripper/cutter
Required Materials for this Project
Avoid last-minute shopping trips by having all your materials ready ahead of time. Here’s a list.
- New plug
Step 1: Buy a polarized replacement plug, if needed
Damaged plugs and nicked, frayed cords are a safety hazard and need to be replaced. Putting a new plug on is straightforward, but there are a few basic rules.
To prevent shocks from the metal parts of a light, lamp cords and two-wire extension cords are always polarized. This means the plug has a small blade for the hot wire and a wide blade for the neutral wire, and the wires feeding those blades should not be reversed when you put a new plug on. Always use a polarized plug for a lamp, extension cord or any other cord that’s polarized to begin with. Don’t ever use a non polarized replacement plug with same-size blades to replace a polarized plug. (Non Polarized plugs are often found on double-insulated tools and some appliances.)
Step 2: Identify the neutral wire
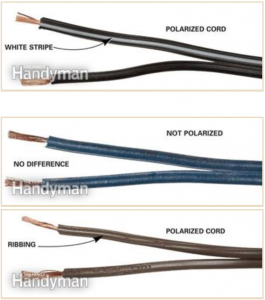
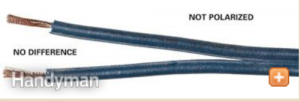
You can identify the neutral side of the wire just by looking for markings on one of the wires. The most common identifier is ribbing in the rubber insulation all along one edge, but it can also be a white wire or a white stripe (photo below).
How to Identify the Neutral Wire
To identify the neutral wire look for the markings shown in the photos.
Polarized cord


Step 3: Wire the new plug
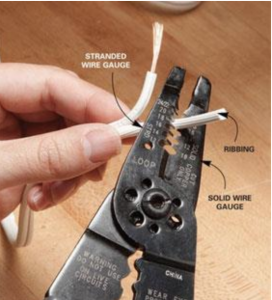
Photo 1: Strip the insulation
Strip the insulation off the wire by cutting and pulling the wire through the wire stripper.

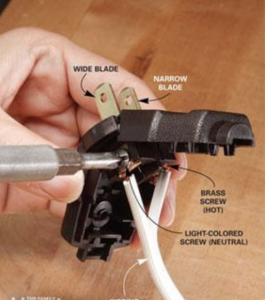
Photo 2: Connect the wires
Wrap each wire around the correct screw in a clockwise direction, then screw it tight.

Strip the insulation off the wire by cutting and pulling the wire through the wire stripper.
To prepare the cut end for a new plug, cut or pull the two sides apart, then strip off about 3/4 in. of insulation (Photo 1). Lamp and extension cords are usually 18 gauge, but if you’re not sure, strip the wire through the 14- or 16-gauge slot first. If it doesn’t strip cleanly, try the next gauge. Note: Stranded (“STRD”) wire gauges are marked on the left, solid gauges are marked on the right.
Twist the strands of wire tight, then fasten them into the replacement plug with the neutral on the wide-blade side (Photo 2). Then snap or screw the plug back together.
www.grandbrass.com – Most of the parts I link to in this lesson are from Grand Brass. They have almost EVERYTHING. The only downside to them, is that delivery can take up to 2 weeks if you live on the West Coast.
www.txlampparts.net – Texas Lamp Parts. They offer faster delivery than Grand Brass, but their selection is a bit more limited.
Smaller or more specialized suppliers:
www.antiquelampsupply.com – Antique Lamp Supply has a very limited selection, but carries the round self-adhesive felt circles that I love!
www.mylampparts.com – My Lamp Parts also has a limited selection, but had the lamp base I was looking for to make my Mug Stack lamp I link to in Lesson 8.
The widest selection of cloth covered cord (Grand Brass is a close second) can be found at:
www.sundialwire.com – Sundial Wire are producers of cloth covered cord made entirely in the USA. Not all are UL listed.


